MICROSOFT WORD
 Microsoft Word
Is a word processor developed
by Microsoft. It was first released in 1983 under
the name Multi-Tool Word for Xenix systems. Subsequent
versions were later written for several other platforms includingIBM PCs running DOS (1983), Apple Macintosh running Mac OS (1985), AT&T Unix PC (1985), Atari ST (1988),SCO Unix (1994), OS/2 (1989),
and Microsoft Windows (1989).
Commercial versions of Word are licensed as a standalone product or as a
component of Microsoft Office, Windows RT or the discontinued Microsoft Works suite. Freeware editions
of Word are Microsoft Word
Viewer and Office Online, both of which have limited features.
History of Microsoft Word

Charles Simonyi (Hungarian: Simonyi Károly, pronounced [ˈʃimoɲi ˈkɑːroj]; born September 10, 1948), son of Károly Simonyi, is a Hungarian-American computer software executive who, as head of Microsoft's application software group, oversaw the creation of Microsoft's flagship Office suite of applications. He now heads his own company, Intentional Software,with the aim of developing and marketing his concept of intentional programming.In April 2007, aboard Soyuz TMA-10, he became the fifth space tourist and the second Hungarian in space. In March 2009, aboard Soyuz TMA-14, he made a second trip to the International Space Station. His estimated net worth is US$1 billion.
The first version of Microsoft Word was developed by Charles Simonyi and Richard
Brodie, former Xerox programmers hired by Bill Gates and Paul Allen in 1981. Both programmers worked on Xerox Bravo, the first WYSIWYG word processor. The first Word version,
Word 1.0, was released in October 1983 for Xenix and MS-DOS; it was followed by four very similar versions
that were not very successful. The first Windows version was released in 1989,
with a slightly improved interface. When Windows 3.0 was released in 1990, Word
became a huge commercial success. Word for Windows 1.0 was followed by Word 2.0
in 1991 and Word 6.0 in 1993. Then it was renamed to Word 95 and Word 97, Word
2000 and Word for Office XP (to
follow Windows commercial names). With the release of Word 2003, the numbering
was again year-based. Since then, Word 2007, Word 2010, and most recently, Word
2013 have been released for Windows.
In 1986, an agreement
between Atari and Microsoft brought Word to the Atari ST.The
Atari ST version was a translation of Word 1.05 for the Apple Macintosh;
however, it was released under the name Microsoft Write (the name of the word processor
included with Windows during the 80s and early 90s).[2][3] Unlike
other versions of Word, the Atari version was a one time release with no future
updates or revisions. The release of Microsoft Write was one of two major PC
applications that were released for the Atari ST (the other application being
WordPerfect). Microsoft Write was released for the Atari ST in 1988.
Charles Simonyi (Hungarian: Simonyi Károly, pronounced [ˈʃimoɲi ˈkɑːroj]; born September 10, 1948), son of Károly Simonyi, is a Hungarian-American computer software executive who, as head of Microsoft's application software group, oversaw the creation of Microsoft's flagship Office suite of applications. He now heads his own company, Intentional Software,with the aim of developing and marketing his concept of intentional programming.In April 2007, aboard Soyuz TMA-10, he became the fifth space tourist and the second Hungarian in space. In March 2009, aboard Soyuz TMA-14, he made a second trip to the International Space Station. His estimated net worth is US$1 billion.
Origins and growth
In 1981, Microsoft hired Charles
Simonyi, the primary developer of Bravo,
the first GUI word
processor, which was developed at Xerox PARC. Simonyi
started work on a word processor called Multi-Tool Word and
soon hired Richard Brodie, a former Xerox intern, who
became the primary software engineer.
Microsoft announced Multi-Tool Word
for Xenix and
MS-DOS in 1983. Its name was soon simplified to Microsoft Word. Free
demonstration copies of the application were bundled with the November 1983
issue of PC World, making it the first to be
distributed on-disk with a magazine.That year Microsoft demonstrated Word running
on Windows.
Microsoft Word and their Functions
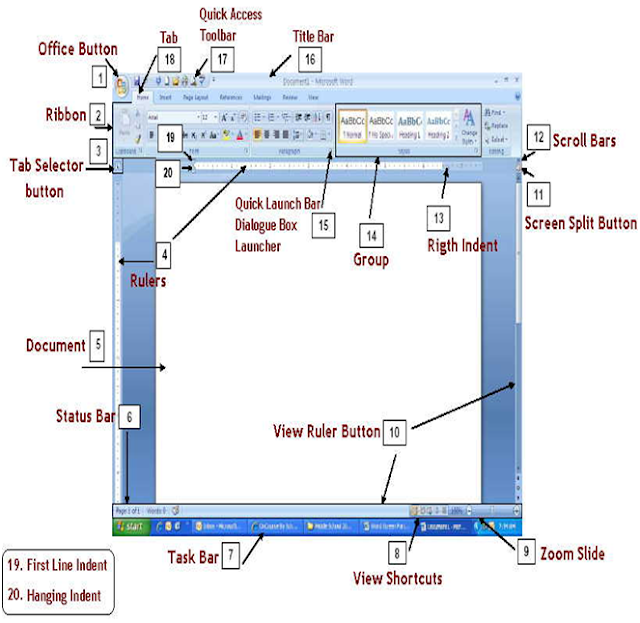
1. Office Button –
Click the Office Button to find a drop down menu containing options, such as:
open, save, and
print. Also shows previously opened files,
which you may choose to “pin” them to make them “permanent”
choices.
2. Ribbon –
The Ribbon is the strip of buttons and icons located above the work area in
Word 2007. The Ribbon
replaces the menus and toolbars found in
earlier versions of Word. Each ribbon contains groups of command
buttons with common purpose. Each ribbon
contains 7 tabs.
3. Tab Selector button –
You can easily set tab stops by clicking on the desired position on the ruler.
This button
allows you to determine which type of tab
will be set left aligned , right aligned , center aligned or
decimal tab . Clicking on this button will
allow you to change the tab style.
4. Rulers –
Gives you an idea of where you are on the page
5. Document –
This is what you are typing/what will print out
6. Status Bar – This row can be customized by right-clicking
and selecting desired options. Desired options may
include page number/number of total page,
word count, insert/overtype mode, caps lock, and zoom slide.
7. Task Bar –
Shows open programs.
8. View Shortcuts –
These four buttons allow you to change the way you view your document on the
screen. From
left to right they are: print layout, full
screen reading, web layout and draft. These can be added/removed by right
clicking anywhere on the status bar and
checking/unchecking View shortcuts.
9. Zoom Slide –
Allows you to increase/decrease the amount of the document you see on the
screen.
10. View Ruler Button –
Allows you to view/hide the rulers.
11. Screen Split Button – At
the top of the vertical scroll bar is a new button. Just below the double arrow
is a tiny
button that looks like a minus sign that
lets you split your screen in two when double-clicked. Double-clicking it a
second time will unsplit your screen.
12. Scroll Bars –
Allows you to view entire workbook by moving it up, down (vertical scroll bar),
left or right (horizontal
scroll bar).
13. Right Indent –
Slide this triangle to the left of the margin to limit the right side of a
paragraph to that point. Move
the triangle to the right of the margin to
allow the right side of the paragraph to extend beyond the margin. The
triangle at the margin will keep the right
side of the paragraph with the margin.
14. Group –
Command buttons with a common purpose are clustered together. Each ribbon
contains several groups.
Some groups, but not all, contain a quick
launch bar (dialogue box launcher) in the bottom right hand corner.
15. Quick Launch Bar/Dialogue Box
Launcher – It is the arrow in the bottom right hand
corner of some
groups. When clicked, it will bring up a
dialog box where additional options/changes can be entered.
16. Title Bar –
Shows name of program and open document. Also contains minimize, maximize and
close buttons.
17. Quick Access Toolbar –
This customizable toolbar allows you to add frequently used commands. Click on
the
down arrow at the end of the toolbar to
add/remove command buttons – or - right-click on any command button
and choose Add to Quick Access Toolbar.
18. Tab –
The ribbon is broken down into 7 tabs. Each tab has a common purpose and
consists of several groups. To
select a tab, simply click on it and the
appropriate groups will be displayed.
19. First Line Indent –
This triangle controls where the first line of a paragraph begins. Moved to the
left of the
margin, will allow the first paragraph to
be in the left margin. Can be moved to the right of the margin to indent
your paragraph. THIS IS NOT SETTING TABS!
20. Hanging Indent – The opposite of a first line indent. It is
often moved to the right of the first line indent, which
allows the remaining lines of a paragraph
to be indented according to placement of the triangle.
references
http://en.wikipedia.org/wiki/Microsoft_Wordhttp://en.wikipedia.org/wiki/Charles_Simonyi
No comments:
Post a Comment